Monday, August 20, 2012

Split String function in MySQL


DROP FUNCTION IF EXISTS SPLIT_STR;
CREATE FUNCTION SPLIT_STR(
  x VARCHAR(255),
  delim VARCHAR(12),
  pos INT
)
RETURNS VARCHAR(255)
RETURN REPLACE(SUBSTRING(SUBSTRING_INDEX(x, delim, pos),
       LENGTH(SUBSTRING_INDEX(x, delim, pos -1)) + 1),
       delim, '');

SELECT SPLIT_STR(string, delimiter, position);

Example :
SELECT SPLIT_STR('a|bb|ccc|dd', '|', 3) as third;

Wednesday, July 25, 2012

How to re-direct the data or logs directory in MySQL, Terracotta Cache, Job and Task Tracker logs


1) File : /etc/my.cnf
datadir=/mysql/data

2) In terracotta cache
file : tc-config.xml
, and tag

3) Hadoop logs (job tracker and task tracker)
file : /etc/hadoop/conf/mapred-site.xml
In property tag : mapred.local.dir

mapred.local.dir
/hadoop/tmplocal
Note : Restart task tracker and job tracker once you modified configuration.

Tuesday, July 17, 2012

Block and unblock wifi (wireless fidelity) in linux

rfkill list - This command will show whether hardware or software blocked the wifi in your system.

rfkill unblock wifi - This command will enable software wifi in your laptop.

Reboot your machine once you unblocked.

Sunday, July 15, 2012

Install vpnc in Ubuntu.

In Synatpic Manager install 'vpnc', NetworkManager-vpnc.

In Vpn connection load pcf file. Update the username and reboot the machine.

You can see the username for the vpn and connect into it.

Saturday, July 14, 2012

Too many open files error in linux

If the error is too many open files increase the ulimit in linux for that user whichever user you start the process.

Default open files allowed : 1024

To see current open files execute below command :
lsof | wc -l

Edit in below files and logout and login.
vi /etc/security/limits.d/99-hadoop.nofiles.conf
vi /etc/security/limits.d/hbase.nofiles.conf

To check ulimit
ulimit -Hn (Hard limit)
ulimit -Sn (Soft limit)

Logout and Login
None of the changes you have made above will have any effect until you logout and back in. You do not need to reboot your system or reinstall any software.

http://www.cyberciti.biz/faq/linux-increase-the-maximum-number-of-open-files/

To see the list of listening port in linux :
lsof | grep LISTEN

To see the list of listening tcp in linux
lsof | grep TCP

Thursday, June 28, 2012

Continuous Build Integration - Hudson Rocks


As every body knows in agile methodology now we need continuous build integration. I used hudson and its amazing. http://hudson-ci.org/ Download and install.

Start the hudson in root. Though its a bad practice so many rights issue raising.  Update the file : /etc/sysconfig/hudson for hudson user start up and to add environment variables. Adding environment variables in Hudson -> Manage Hudson -> Configure System sucks.

Having said tool is really great to work .

Below from the hudson configuration file :

export ANT_HOME="/opt/apache-ant-1.8.3"
export PATH=${PATH}:${ANT_HOME}/bin
export ANT_OPTS="-Dhttp.proxyHost=proxy -Dhttp.proxyPort=8080"

hudson-url/manage -> configure system
hudson build / configure (configuration)

Tuesday, June 5, 2012

Google Guava Collections are awesome

Guava introduces a number of new collection types that are not in the JDK, but that we have found to be broadly useful. These are all designed to coexist happily with the JDK collections framework, without shoehorning things into the JDK collection abstractions.


1 line joiner : String groupConfiguration = Joiner.on(SMSConstants.commaDelimiter).join(uniqGroupConcats);
1 line splitter : String ilcId = Lists.newArrayList(Splitter.on(SMSConstants.rowidFieldDelimiter).split(Bytes.toString(values.getRow()))).get(1);

1 line to print the map values : Joiner.on("\n").withKeyValueSeparator("=>").join(defaultExpectedPS)

MultiMap : A collection similar to a Map, but which may associate multiple values with a single key. If you call put(K, V) twice, with the same key but different values, the multimap contains mappings from the key to both values.

List Partition : Lists.partition is again easy to split list into multiple list and loop it.

http://code.google.com/p/guava-libraries/wiki/NewCollectionTypesExplained#Table

In our application i am trying to use Table from guava. Below is the example :


             // We can create a table in java memory using guava ;)
Table> ilcGroupConfiguration =   HashBasedTable.create();

ilcGroupConfiguration.put("SCID 1", "G1+G2", Arrays.asList("Zigbee1", "Zigbee2"));
ilcGroupConfiguration.put("SCID 2", "G1+G2+G3", Arrays.asList("Zigbee3", "Zigbee4"));

// RowKeySet() :  Returns a set of row keys that have one or more values in the table.
for (String ilcGroup1 : ilcGroupConfiguration.rowKeySet()) {

System.out.println("Keys SC : " + ilcGroup1);
// row(rowKey) : Returns a view of all mappings that have the given row key.
Map> ilcGroupCommand = new HashMap>();
ilcGroupCommand = ilcGroupConfiguration.row(ilcGroup1);

for (String ilcGroupCommandgc : ilcGroupCommand.keySet()) {
System.out.println("Keys GC : " + ilcGroupCommandgc);
List ilcIds = ilcGroupCommand.get(ilcGroupCommandgc);
System.out.println("Keys ILC Ids : " + ilcIds);
}
}

Lists.partition is again easy. If you want to split the for loop every 1000 use lists.partition
for (List devices : Lists.partition(devicesLists, 1000) {
    for (Device device : devices) {
    }
}

Amazing Things mentioned about guava examples : http://blog.solidcraft.eu/2010/10/googole-guava-v07-examples.html
OrderingExplainedGood 

Monday, June 4, 2012

Creating XML's / Email using Template in Java

If you want to create a simple xml with template StringTemplate is good to use it. It's same like JSP. http://www.antlr.org/wiki/display/ST/Five+minute+Introduction is very nice to use it.

If you have collections, Map and more string operation to create xml using template go for Apache Velocity its very nice. Good tutorial about the velocity examples :
http://today.java.net/pub/a/today/2003/12/16/velocity.html
http://www.java2s.com/Code/Java/Velocity/ShowbasicXMLhandlinginatemplate.htm

Friday, May 11, 2012

Install Apache Ant, build and write Script

Install ant in linux :

a. Download apache ant latest release always : http://ant.apache.org/bindownload.cgi

b. Extract the zip folder or .tar.gz

c. Set environment variable for ANT_HOME and JAVA_HOME in .bashrc file. Add ANT_HOME/bin into PATH Env variable.

  i) which java (This command in terminal tells you the java installed path)
export JAVA_HOME="/usr/lib/jvm/java-6-openjdk"
export ANT_HOME="/home/gubendran/java/apache-ant-1.8.3"
export PATH="${PATH}:${ANT_HOME}/bin"

d. Execute the .bashrc file. source ~/.bashrc

e. Just Read manual from apache  (Click tutorial to do Hello World using Apache Ant. Its simple and excellent : http://ant.apache.org/manual/)

f. Create build.xml file
g. Run the ant script using target name : ant clean compile jar run


Tuesday, May 8, 2012

Websites you should bookmark

Business News
businessinsider.com

Geek
howtogeek.com
theserverside.com

Movie Ratings
http://www.rottentomatoes.com/

Find out crime info. in US street wise
http://www.trulia.com/

News
ndtv.com

Good forum site
stackoverflow.com

Best Website to buy anything 
amazon.com

Free Diet Plans
http://www.sparkpeople.com/

Order kids things in India
http://www.hoopos.com/

Car Websites (Rental cars App)
http://www.zipcar.com/ (Good web-site. You will get car for an hourly basis in nearby location for cheap)
http://www.enterprise.com/car_rental/home.do
getaround.com (Peer-to-Peer rental cars)

Friday, April 13, 2012

Java Code Snippets

1. Convert Set into List in Java 1 liner :
Convert Set to array and convert array to list
Set Ids = new HashSet();
Arrays.asList(Ids.toArray())

Enum Class :

public enum DeviceStates {
SHIPPED ("SHIPPED", 1),
INSTALLED_NOT_REPORTING("INSTALLED_NOT_REPORTING", 2),
NWKDESIGNED_NOT_REPORTING("NWKDESIGNED_NOT_REPORTING", 3),
NOT_INSTALLED_REPORTING("NOT_INSTALLED_REPORTING", 4),
NOT_DESIGNED_REPORTING("NOT_DESIGNED_REPORTING", 5),
REPORTING("REPORTING", 6),
RMA("RMA", 7),
SCRAPPED("SCRAPPED", 8);

private long deviceStateId;
private String deviceStateName;

public long getDeviceStateId() {
return deviceStateId;
}

DeviceStates(String deviceStateName, long deviceStateId) {
this.deviceStateId = deviceStateId;
this.deviceStateName = deviceStateName;
}

public String getDeviceStateName() {
return deviceStateName;
}

public void setDeviceStateName(String deviceStateName) {
this.deviceStateName = deviceStateName;
}
}

public enum status {
         ACTIVE,
         INACTIVE
}
Saturday, April 7, 2012

Make your linux work with skype using Cheese and shell

Follow this link for detailed : http://pkill-9.com/logictech-quick-cam-work-skype-linux/

Ubuntu has the video driver installed by default.

1) Connect your USB WebCam on laptop / desktop
2) Install cheese (apt-get install cheese)
3) Open the cheese and check your video. You should be good. Cheese picks output of (/dev/video0). The video driver for the webcam installed under (ls /dev/video*)
4) Make sure you install skype 32-bit. Since, windows not allowing skype to release latest version and latest bit for linux.
5) Open your skype and in options 'Video' test your video. If not don't panic. Wait to reload the driver for skype.
6) In your $HOME directory create a shell script called skype.sh  with below context (vi $HOME/skype.sh) and save

#!/bin/bash
#
# script preloads the video for linux (v4l) libs needed by skype
#
LD_PRELOAD=/usr/lib/libv4l/v4l1compat.so /usr/bin/skype

 
7) Quit and close  your skype
8) Go to skype properties and in command provide "sh skype.sh"

9) Star your skype and in options 'Video' test your video. you should be good. Since, skype pre-loads.


Thursday, March 22, 2012

java.lang.OutOfMemory in Java

There are 3 OutOfMemory error cases in java we can see frequently in production with default parameters.

1) Java.lang.OutOfMemoryError: Java heap space
2) Java.lang.OutOfMemoryError: PermGen space
3) java.lang.OutOfMemoryError: GC overhead limit exceeded

1) Java.lang.OutOfMemoryError: Java heap space : 

What is java heap space ?

while you try to create an object and there is not enough space in heap to allocate that object you will get this error. 

How to solve ? 

Increase the heap size memory. Use : -Xms512m  -Xmx1024m

a) In production server / linux by adding parameter in JAVA_OPTS 
b) for eclipse add in eclipse.ini file under vmargs
c) In standalone program pass in vm Arguments. 

Note : Xms represent heap size minimum. Xmx represent heap size maximum. Based on the ram you have you can allocate. 


Read more: http://javarevisited.blogspot.com/2011/09/javalangoutofmemoryerror-permgen-space.html#ixzz2KEV0BOiK

2) Java.lang.OutOfMemoryError: PermGen space

what is PermGen Space ? 

PermGen Space of heap is used to store classes and Meta data about classes in Java. When a class is loaded by a classloader it got stored in PermGen space, it gets unloaded only when the classloader which loaded this class got garbage collected. If any object retains reference of classloader than its not garbage collected and Perm Gen Space is not freed up. This causes memory leak in PermGen Space and eventually cause java.lang.OutOfMemoryError: PermGen space

How to Solve ?

Increase the permSize memory. Use : -XX:MaxPermSize=256m

By default JVM allocates 64M for perm space. You can increase it by passing argument. 

a) In production server / linux by adding parameter in JAVA_OPTS 
b) for eclipse add in eclipse.ini file under vmargs
c) In standalone program pass in vm Arguments. 

For tomcat in bin/catalina.sh add options in CATALINA_OPTS for setting the heap and perm space. You can also add below options.
-XX:+UseParallelGC -XX:+UseParallelOldGC -Xloggc:gc.log  -XX:HeapDumpPath=DumpPath -XX:+UseCompressedOops


Read more: http://javarevisited.blogspot.com/2012/01/tomcat-javalangoutofmemoryerror-permgen.html#ixzz2KEWjRaC1

3) java.lang.OutOfMemoryError: GC overhead limit exceeded

Mostly when you use HashMap objects to dump the data you may get this above error. There are 4 ways to avoid the same.

  1. Specify more memory, try something in between like -Xmx1024m first
  2. Work with smaller batches of HashMap objects to process at once if possible
  3. If you have a lot of duplicate strings, use String.intern() on them before putting them into the HashMap (String.intern will save lot of spaces on blank strings and duplicate strings).This will slow down your process. Having said memory utilization on the heap will be very less. Refer article : https://blog.codecentric.de/en/2012/03/save-memory-by-using-string-intern-in-java/ for more 
  4. Use the HashMap(int initialCapacity, float loadFactor) or HashMap(initialCapacity) constructor to tune for your case ex : new HashMap(100000).
You can Disable the error check altogether, via "-XX:-UseGCOverheadLimit". But, you will end up getting heap space OOM error. So, try to use the above methodologies to avoid or tweak your logic to avoid storing huge contents in hashMap objects.

Refer for more OOM : http://www.theserverside.com/news/thread.tss?thread_id=79323 

Eclipse Out Of Memory Error : 
If you use eclipse update memory configuration in JRE
Eclipse -> Window -> Preference -> Java-> Installed JREs -> select the running JRE -> Default VM arguments pass the arguments
"-Xms512m  -Xmx1024m -XX:MaxPermSize=256m"


4 types of Garbage Collectors : Refer : 
http://www.takipiblog.com/garbage-collectors-serial-vs-parallel-vs-cms-vs-the-g1-and-whats-new-in-java-8/

Tuesday, February 21, 2012

Browser Shortcut keys

google Chrome / Firefox shortcut key 
  ctrl + shift + delete ->  This will bring Clear browsing data

Java is Pass-by-value

In java there is no pass by reference. Its having only "pass by value".

In "primitive data type" only the value is getting passed. In object only the object reference getting passed as value. 


Refer : http://javadude.com/articles/passbyvalue.htm for detailed example compare with C++ and C.

Sunday, February 12, 2012

Important Things to know for android App development

Managing Projects

Managing project structure on android Project is very important for development. The folder structure, classes, interfaces, xml should be added in the correct folder. Android project will by default create the folder structure in eclipse under package. You need to read below and place the classes accordingly.

Android Project folder conventions  (Article : http://developer.android.com/guide/developing/projects/index.html)
Android projects are the projects that eventually get built into an .apk file that you install onto a device. They contain things such as application source code and resource files. Some are generated for you by default, while others should be created if required. The following directories and files comprise an Android project:
src/
Contains your stub Activity file, which is stored at src/your/package/namespace/ActivityName.java. All other source code files (such as .java or .aidl files) go here as well.
bin
Output directory of the build. This is where you can find the final .apk file and other compiled resources.
jni
Contains native code sources developed using the Android NDK. For more information, see the Android NDK documentation.
gen/
Contains the Java files generated by ADT, such as your R.java file and interfaces created from AIDL files.
assets/
This is empty. You can use it to store raw asset files. Files that you save here are compiled into an .apk file as-is, and the original filename is preserved. You can navigate this directory in the same way as a typical file system using URIs and read files as a stream of bytes using the theAssetManager. For example, this is a good location for textures and game data.
res/
Contains application resources, such as drawable files, layout files, and string values. See Application Resources for more information.
anim/
For XML files that are compiled into animation objects. See the Animation resource type.
color/
For XML files that describe colors. See the Color Values resource type.
drawable/
For bitmap files (PNG, JPEG, or GIF), 9-Patch image files, and XML files that describe Drawable shapes or a Drawable objects that contain multiple states (normal, pressed, or focused). See the Drawable resource type.
layout/
XML files that are compiled into screen layouts (or part of a screen). See the Layout resource type.
menu/
For XML files that define application menus. See the Menus resource type.
raw/
For arbitrary raw asset files. Saving asset files here instead of in the assets/ directory only differs in the way that you access them. These files are processed by aapt and must be referenced from the application using a resource identifier in the R class. For example, this is a good place for media, such as MP3 or Ogg files.
values/
For XML files that are compiled into many kinds of resource. Unlike other resources in the res/ directory, resources written to XML files in this folder are not referenced by the file name. Instead, the XML element type controls how the resources is defined within them are placed into the R class.
xml/
For miscellaneous XML files that configure application components. For example, an XML file that defines a PreferenceScreen,AppWidgetProviderInfo, or Searchability Metadata. See Application Resources for more information about configuring these application components.
libs/
Contains private libraries.
AndroidManifest.xml
The control file that describes the nature of the application and each of its components. For instance, it describes: certain qualities about the activities, services, intent receivers, and content providers; what permissions are requested; what external libraries are needed; what device features are required, what API Levels are supported or required; and others. See the AndroidManifest.xml documentation for more information
project.properties
This file contains project settings, such as the build target. This file is integral to the project, so maintain it in a source revision control system. To edit project properties in Eclipse, right-click the project folder and select Properties.
Signing your Application is important for App launch in Google market.


Saturday, February 11, 2012

Android developers should know this Technical acronyms

Android SDK - Android Software Development Kit
ADT - Android Development Tool
JDK - Java Development Kit
JDT - Java Development Tool
Emulator - Virtual mobile device to run android development apps on your computer
AVD - Android Virtual Device
APK - Android Application Package File (Its a file to install and distribute application to Android OS)
ADB - Android Debug Bridge
Ogg is a free, open container format maintained by the Xiph.Org Foundation. The creators of the Ogg format state that it is unrestricted by software patents[4] and is designed to provide for efficient streaming and manipulation of high quality digital multimedia.
dpi - Dot Per Inch
hdpi - high dot per Inch
mdpi - medium dot per Inch
ldpi - low dot per Inch
320dp: a typical phone screen (240x320 ldpi, 320x480 mdpi, 480x800 hdpi, etc).


If you want to be a android developer click here. Complete documentation and API's available for you.
If you questions keep post in Android Forum

Friday, February 10, 2012

How to setup / start Android development in fedora ?

How to start Android development in fedora. 


System Requirements
1) Download Fedora version > Fedora 12. If you don't have Install fedora.

2) Install JDK (Java Development Kit) in fedora.
    Execute : yum search jdk. Once you get execute "yum install java-1.6.0-openjdk" from root.

If you want to download specific java version and install : Click

3) Download Eclipse with version > 3.5 (Due to ADT [Android Development Tool] plugin dependency on Equinox need). If you don't have Download Eclipse

4) Install Eclipse Java Development Tools from Terminal with `root` permission.
yum install eclipse-jdt 


5) Download  Android SDK based on System Requirements specification (Android is available only in 32bit. So, if you have 64-bit its ok). Extract it. If (.tgz) execute command (tar -xzf android-sdk_r16-linux.tgz). It will extract into folder android-sdk-linux.
  • Copy the extracted (android-sdk-linux) folder into $HOME directory with name android-sdk-linux
  • Add into path environment variable ~/android-sdk-linux in .bash_profile file in your home directory. 
            export PATH=$PATH:$HOME/android-sdk-linux:$HOME/android-sdk-linux/tools 

6) Install Android Development Tool Plugin for Eclipse
Android offers a custom plugin for the Eclipse IDE, called Android Development Tools (ADT), that is designed to give you a powerful, integrated environment in which to build Android applications. Its easy to debug and develop in Eclipse IDE.


Start Eclipse, then select Help > Install new software...


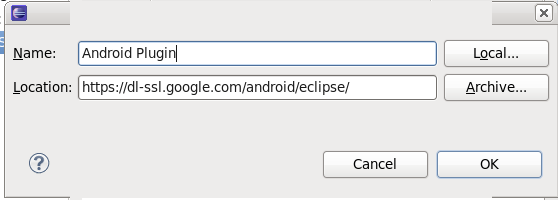
Again click on Add button and enter a name for the another remote site (for example, "Android Plugin") in the "Name" field. In the "Location" field, enter this URL:

https://dl-ssl.google.com/android/eclipse/ 
Note: If you have trouble acquiring the plugin, you can try using "http" in the URL, instead of "https" (https is preferred for security reasons).Click OK.Add ADT plugin Eclipse.png
    • Back in the Available Software view, next to "Work with:", you should now in see in drop down list "Android Plugin", select it and in box below see "Developer Tools" added to the list. Select the checkbox next to Developer Tools, which will automatically select the nested tools Android DDMS and Android Development Tools. Click Next.
    • In the resulting Install Details dialog, the Android DDMS and Android Development Tools features are listed. Click Next to read and accept the license agreement and install any dependencies, then click Finish.
    • Restart Eclipse.


Note : If you get any socket error try again doing the same steps above again.

7) Android Emulator
The Android SDK includes a mobile device emulator — a virtual mobile device that runs on your computer. The emulator lets you develop and test Android applications without using a physical device.

Note : Android sdk is available only for 32-bit. So, if you have 32-bit or 64-bit use below.

yum install glibc.i686 glibc-devel.i686 libstdc++.i686 zlib-devel.i686 ncurses-devel.i686 libX11-devel.i686 libXrender.i686 libXrandr.i686

8) Create AVD device (Android Virtual device) in Android SDK Manager
This tool will be used for test our android application.

  • cd into the ~/android-sdk-linux directory and run tools/android to configure and create your first Android Virtual Device.
  • Select the packages, tools, api's you want to install. Click 'Install'
  • Go to Tools -> Manage  AVDs 
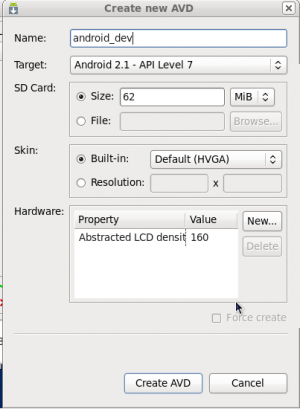
  • Click 'New'  and provide AVD Details
  1. where you need to specify SD card size (I will use 62MiB), name of device (I will use "android_dev1", target (Android 2.1, if you want to develop for different target, you need to go to step 2 and install SDK platform for different version).Thumb
  2. Now click on "Create AVD" which will create Android Virtual Device.

Note : There is no close button in AVD Device window. Just 'Esc'


9) Open Eclipse

Window -> Preferences -> Android
and enter a location of your Android SDK installation into SDK Location Box and click apply:
Connect android sdk with eclipse
Press OK and we are done.


Write a Simple Android Program

  • Open Eclipse and navigate to:
  • File -> New -> Project -> Android -> Android Project
  • and insert a following information to start a new Android Project:
  • PackageName (MyFirstAndroidSample), ClassName(MyFirstAndroidSampleActivity), TestClassName(MyFirstAndroidSampleTest)
  • Press Finish.
  • On your left hand side you have a "Package Explorer. Use a package Explorer to navigate to:
  • MyFirstAndroidSample (Package) -> src -> com.gubs.android
  • From there double-click on GubsFirstSampleAndroidApp.java

Replace an existing code:
package com.gubs.android;

import android.app.Activity;
import android.os.Bundle;
import android.widget.TextView;

public class GubsFirstSampleAndroidApp extends Activity {
    /** Called when the activity is first created. */
    @Override
    public void onCreate(Bundle savedInstanceState) {
        super.onCreate(savedInstanceState);
        setContentView(R.layout.main);
        TextView tv = new TextView(this);
        tv.setText("Hello Android..Its Gubs and my first App");
        setContentView(tv);
    }
}

Save the class or (Ctrl + S)

Testing new android application

Now that you have saved your new project you can attempt to run it by navigating to:
Run -> Run -> Android Application -> OK


You will see the above android virtual device with your program. Andriod emulator may take some time to load. Please wait.
Click "Menu / back" in the right side of the keyboard in android emulator to go to the home page of the android emulator and click applications to see your app.


If you have questions feel free to update comments and i can try if i could help.


Tutorials i tried : 
http://fedoraproject.org/wiki/HOWTO_Setup_Android_Development
http://linuxconfig.org/get-started-with-android-application-development-using-linux-and-android-sdk
http://developer.android.com/guide/index.html


// Below script tag for SyntaxHighLighter