How to start Android development in fedora.
System Requirements
1) Download Fedora version > Fedora 12. If you don't have Install fedora.
2) Install JDK (Java Development Kit) in fedora.
Execute : yum search jdk. Once you get execute "yum install java-1.6.0-openjdk" from root.
If you want to download specific java version and install : Click
3) Download Eclipse with version > 3.5 (Due to ADT [Android Development Tool] plugin dependency on Equinox need). If you don't have Download Eclipse
4) Install Eclipse Java Development Tools from Terminal with `root` permission.
yum install eclipse-jdt
5) Download Android SDK based on System Requirements specification (Android is available only in 32bit. So, if you have 64-bit its ok). Extract it. If (.tgz) execute command (tar -xzf android-sdk_r16-linux.tgz). It will extract into folder android-sdk-linux.
6) Install Android Development Tool Plugin for Eclipse
Android offers a custom plugin for the Eclipse IDE, called Android Development Tools (ADT), that is designed to give you a powerful, integrated environment in which to build Android applications. Its easy to debug and develop in Eclipse IDE.
Start Eclipse, then select Help > Install new software...
Again click on Add button and enter a name for the another remote site (for example, "Android Plugin") in the "Name" field. In the "Location" field, enter this URL:
7) Android Emulator
The Android SDK includes a mobile device emulator — a virtual mobile device that runs on your computer. The emulator lets you develop and test Android applications without using a physical device.
http://linuxconfig.org/get-started-with-android-application-development-using-linux-and-android-sdk
http://developer.android.com/guide/index.html
System Requirements
1) Download Fedora version > Fedora 12. If you don't have Install fedora.
2) Install JDK (Java Development Kit) in fedora.
Execute : yum search jdk. Once you get execute "yum install java-1.6.0-openjdk" from root.
If you want to download specific java version and install : Click
3) Download Eclipse with version > 3.5 (Due to ADT [Android Development Tool] plugin dependency on Equinox need). If you don't have Download Eclipse
4) Install Eclipse Java Development Tools from Terminal with `root` permission.
yum install eclipse-jdt
5) Download Android SDK based on System Requirements specification (Android is available only in 32bit. So, if you have 64-bit its ok). Extract it. If (.tgz) execute command (tar -xzf android-sdk_r16-linux.tgz). It will extract into folder android-sdk-linux.
- Copy the extracted (android-sdk-linux) folder into $HOME directory with name android-sdk-linux
- Add into path environment variable ~/android-sdk-linux in .bash_profile file in your home directory.
6) Install Android Development Tool Plugin for Eclipse
Android offers a custom plugin for the Eclipse IDE, called Android Development Tools (ADT), that is designed to give you a powerful, integrated environment in which to build Android applications. Its easy to debug and develop in Eclipse IDE.
Start Eclipse, then select Help > Install new software...
Again click on Add button and enter a name for the another remote site (for example, "Android Plugin") in the "Name" field. In the "Location" field, enter this URL:
https://dl-ssl.google.com/android/eclipse/
Note: If you have trouble acquiring the plugin, you can try using "http" in the URL, instead of "https" (https is preferred for security reasons).Click OK.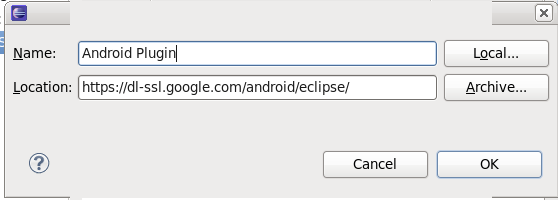

- Back in the Available Software view, next to "Work with:", you should now in see in drop down list "Android Plugin", select it and in box below see "Developer Tools" added to the list. Select the checkbox next to Developer Tools, which will automatically select the nested tools Android DDMS and Android Development Tools. Click Next.
- In the resulting Install Details dialog, the Android DDMS and Android Development Tools features are listed. Click Next to read and accept the license agreement and install any dependencies, then click Finish.
- Restart Eclipse.
Note : If you get any socket error try again doing the same steps above again.
7) Android Emulator
The Android SDK includes a mobile device emulator — a virtual mobile device that runs on your computer. The emulator lets you develop and test Android applications without using a physical device.
Read about emulator documentation.
Note : Android sdk is available only for 32-bit. So, if you have 32-bit or 64-bit use below.
yum install glibc.i686 glibc-devel.i686 libstdc++.i686 zlib-devel.i686 ncurses-devel.i686 libX11-devel.i686 libXrender.i686 libXrandr.i686
8) Create AVD device (Android Virtual device) in Android SDK Manager
This tool will be used for test our android application.
9) Open Eclipse


You will see the above android virtual device with your program. Andriod emulator may take some time to load. Please wait.
Click "Menu / back" in the right side of the keyboard in android emulator to go to the home page of the android emulator and click applications to see your app.

If you have questions feel free to update comments and i can try if i could help.
Tutorials i tried :
http://fedoraproject.org/wiki/HOWTO_Setup_Android_DevelopmentThis tool will be used for test our android application.
- cd into the ~/android-sdk-linux directory and run tools/android to configure and create your first Android Virtual Device.
- Select the packages, tools, api's you want to install. Click 'Install'
- Go to Tools -> Manage AVDs
- Click 'New' and provide AVD Details
- where you need to specify SD card size (I will use 62MiB), name of device (I will use "android_dev1", target (Android 2.1, if you want to develop for different target, you need to go to step 2 and install SDK platform for different version).
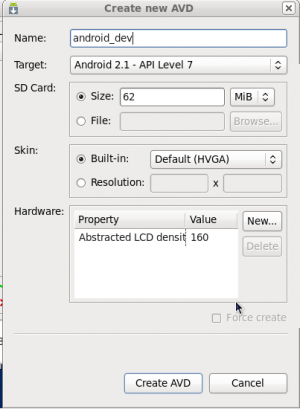
- Now click on "Create AVD" which will create Android Virtual Device.

Note : There is no close button in AVD Device window. Just 'Esc'
9) Open Eclipse
Window -> Preferences -> Android
and enter a location of your Android SDK installation into SDK Location Box and click apply:
Press OK and we are done.
Write a Simple Android Program
- Open Eclipse and navigate to:
- File -> New -> Project -> Android -> Android Project
- and insert a following information to start a new Android Project:
- PackageName (MyFirstAndroidSample), ClassName(MyFirstAndroidSampleActivity), TestClassName(MyFirstAndroidSampleTest)
- Press Finish.
- On your left hand side you have a "Package Explorer. Use a package Explorer to navigate to:
- MyFirstAndroidSample (Package) -> src -> com.gubs.android
- From there double-click on GubsFirstSampleAndroidApp.java
Replace an existing code:
package com.gubs.android;
import android.app.Activity;import android.os.Bundle;import android.widget.TextView;
public class GubsFirstSampleAndroidApp extends Activity { /** Called when the activity is first created. */ @Override public void onCreate(Bundle savedInstanceState) { super.onCreate(savedInstanceState); setContentView(R.layout.main); TextView tv = new TextView(this); tv.setText("Hello Android..Its Gubs and my first App"); setContentView(tv); }}
Save the class or (Ctrl + S)
Testing new android application
Now that you have saved your new project you can attempt to run it by navigating to:
Run -> Run -> Android Application -> OK

Click "Menu / back" in the right side of the keyboard in android emulator to go to the home page of the android emulator and click applications to see your app.

If you have questions feel free to update comments and i can try if i could help.
Tutorials i tried :
http://linuxconfig.org/get-started-with-android-application-development-using-linux-and-android-sdk
http://developer.android.com/guide/index.html
No comments :
Post a Comment