Tuesday, February 21, 2012

Browser Shortcut keys

google Chrome / Firefox shortcut key 
  ctrl + shift + delete ->  This will bring Clear browsing data

Java is Pass-by-value

In java there is no pass by reference. Its having only "pass by value".

In "primitive data type" only the value is getting passed. In object only the object reference getting passed as value. 


Refer : http://javadude.com/articles/passbyvalue.htm for detailed example compare with C++ and C.

Sunday, February 12, 2012

Important Things to know for android App development

Managing Projects

Managing project structure on android Project is very important for development. The folder structure, classes, interfaces, xml should be added in the correct folder. Android project will by default create the folder structure in eclipse under package. You need to read below and place the classes accordingly.

Android Project folder conventions  (Article : http://developer.android.com/guide/developing/projects/index.html)
Android projects are the projects that eventually get built into an .apk file that you install onto a device. They contain things such as application source code and resource files. Some are generated for you by default, while others should be created if required. The following directories and files comprise an Android project:
src/
Contains your stub Activity file, which is stored at src/your/package/namespace/ActivityName.java. All other source code files (such as .java or .aidl files) go here as well.
bin
Output directory of the build. This is where you can find the final .apk file and other compiled resources.
jni
Contains native code sources developed using the Android NDK. For more information, see the Android NDK documentation.
gen/
Contains the Java files generated by ADT, such as your R.java file and interfaces created from AIDL files.
assets/
This is empty. You can use it to store raw asset files. Files that you save here are compiled into an .apk file as-is, and the original filename is preserved. You can navigate this directory in the same way as a typical file system using URIs and read files as a stream of bytes using the theAssetManager. For example, this is a good location for textures and game data.
res/
Contains application resources, such as drawable files, layout files, and string values. See Application Resources for more information.
anim/
For XML files that are compiled into animation objects. See the Animation resource type.
color/
For XML files that describe colors. See the Color Values resource type.
drawable/
For bitmap files (PNG, JPEG, or GIF), 9-Patch image files, and XML files that describe Drawable shapes or a Drawable objects that contain multiple states (normal, pressed, or focused). See the Drawable resource type.
layout/
XML files that are compiled into screen layouts (or part of a screen). See the Layout resource type.
menu/
For XML files that define application menus. See the Menus resource type.
raw/
For arbitrary raw asset files. Saving asset files here instead of in the assets/ directory only differs in the way that you access them. These files are processed by aapt and must be referenced from the application using a resource identifier in the R class. For example, this is a good place for media, such as MP3 or Ogg files.
values/
For XML files that are compiled into many kinds of resource. Unlike other resources in the res/ directory, resources written to XML files in this folder are not referenced by the file name. Instead, the XML element type controls how the resources is defined within them are placed into the R class.
xml/
For miscellaneous XML files that configure application components. For example, an XML file that defines a PreferenceScreen,AppWidgetProviderInfo, or Searchability Metadata. See Application Resources for more information about configuring these application components.
libs/
Contains private libraries.
AndroidManifest.xml
The control file that describes the nature of the application and each of its components. For instance, it describes: certain qualities about the activities, services, intent receivers, and content providers; what permissions are requested; what external libraries are needed; what device features are required, what API Levels are supported or required; and others. See the AndroidManifest.xml documentation for more information
project.properties
This file contains project settings, such as the build target. This file is integral to the project, so maintain it in a source revision control system. To edit project properties in Eclipse, right-click the project folder and select Properties.
Signing your Application is important for App launch in Google market.


Saturday, February 11, 2012

Android developers should know this Technical acronyms

Android SDK - Android Software Development Kit
ADT - Android Development Tool
JDK - Java Development Kit
JDT - Java Development Tool
Emulator - Virtual mobile device to run android development apps on your computer
AVD - Android Virtual Device
APK - Android Application Package File (Its a file to install and distribute application to Android OS)
ADB - Android Debug Bridge
Ogg is a free, open container format maintained by the Xiph.Org Foundation. The creators of the Ogg format state that it is unrestricted by software patents[4] and is designed to provide for efficient streaming and manipulation of high quality digital multimedia.
dpi - Dot Per Inch
hdpi - high dot per Inch
mdpi - medium dot per Inch
ldpi - low dot per Inch
320dp: a typical phone screen (240x320 ldpi, 320x480 mdpi, 480x800 hdpi, etc).


If you want to be a android developer click here. Complete documentation and API's available for you.
If you questions keep post in Android Forum

Friday, February 10, 2012

How to setup / start Android development in fedora ?

How to start Android development in fedora. 


System Requirements
1) Download Fedora version > Fedora 12. If you don't have Install fedora.

2) Install JDK (Java Development Kit) in fedora.
    Execute : yum search jdk. Once you get execute "yum install java-1.6.0-openjdk" from root.

If you want to download specific java version and install : Click

3) Download Eclipse with version > 3.5 (Due to ADT [Android Development Tool] plugin dependency on Equinox need). If you don't have Download Eclipse

4) Install Eclipse Java Development Tools from Terminal with `root` permission.
yum install eclipse-jdt 


5) Download  Android SDK based on System Requirements specification (Android is available only in 32bit. So, if you have 64-bit its ok). Extract it. If (.tgz) execute command (tar -xzf android-sdk_r16-linux.tgz). It will extract into folder android-sdk-linux.
  • Copy the extracted (android-sdk-linux) folder into $HOME directory with name android-sdk-linux
  • Add into path environment variable ~/android-sdk-linux in .bash_profile file in your home directory. 
            export PATH=$PATH:$HOME/android-sdk-linux:$HOME/android-sdk-linux/tools 

6) Install Android Development Tool Plugin for Eclipse
Android offers a custom plugin for the Eclipse IDE, called Android Development Tools (ADT), that is designed to give you a powerful, integrated environment in which to build Android applications. Its easy to debug and develop in Eclipse IDE.


Start Eclipse, then select Help > Install new software...


Again click on Add button and enter a name for the another remote site (for example, "Android Plugin") in the "Name" field. In the "Location" field, enter this URL:

https://dl-ssl.google.com/android/eclipse/ 
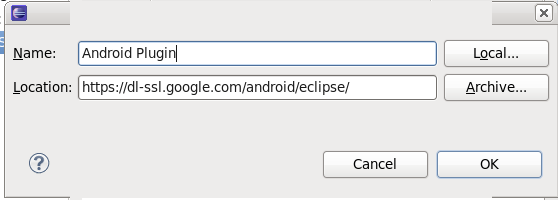
Note: If you have trouble acquiring the plugin, you can try using "http" in the URL, instead of "https" (https is preferred for security reasons).Click OK.Add ADT plugin Eclipse.png
    • Back in the Available Software view, next to "Work with:", you should now in see in drop down list "Android Plugin", select it and in box below see "Developer Tools" added to the list. Select the checkbox next to Developer Tools, which will automatically select the nested tools Android DDMS and Android Development Tools. Click Next.
    • In the resulting Install Details dialog, the Android DDMS and Android Development Tools features are listed. Click Next to read and accept the license agreement and install any dependencies, then click Finish.
    • Restart Eclipse.


Note : If you get any socket error try again doing the same steps above again.

7) Android Emulator
The Android SDK includes a mobile device emulator — a virtual mobile device that runs on your computer. The emulator lets you develop and test Android applications without using a physical device.

Note : Android sdk is available only for 32-bit. So, if you have 32-bit or 64-bit use below.

yum install glibc.i686 glibc-devel.i686 libstdc++.i686 zlib-devel.i686 ncurses-devel.i686 libX11-devel.i686 libXrender.i686 libXrandr.i686
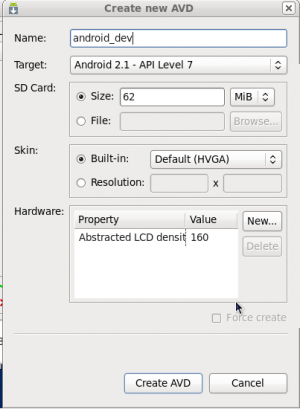
8) Create AVD device (Android Virtual device) in Android SDK Manager
This tool will be used for test our android application.

  • cd into the ~/android-sdk-linux directory and run tools/android to configure and create your first Android Virtual Device.
  • Select the packages, tools, api's you want to install. Click 'Install'
  • Go to Tools -> Manage  AVDs 
  • Click 'New'  and provide AVD Details
  1. where you need to specify SD card size (I will use 62MiB), name of device (I will use "android_dev1", target (Android 2.1, if you want to develop for different target, you need to go to step 2 and install SDK platform for different version).Thumb
  2. Now click on "Create AVD" which will create Android Virtual Device.

Note : There is no close button in AVD Device window. Just 'Esc'


9) Open Eclipse

Window -> Preferences -> Android
and enter a location of your Android SDK installation into SDK Location Box and click apply:
Connect android sdk with eclipse
Press OK and we are done.


Write a Simple Android Program

  • Open Eclipse and navigate to:
  • File -> New -> Project -> Android -> Android Project
  • and insert a following information to start a new Android Project:
  • PackageName (MyFirstAndroidSample), ClassName(MyFirstAndroidSampleActivity), TestClassName(MyFirstAndroidSampleTest)
  • Press Finish.
  • On your left hand side you have a "Package Explorer. Use a package Explorer to navigate to:
  • MyFirstAndroidSample (Package) -> src -> com.gubs.android
  • From there double-click on GubsFirstSampleAndroidApp.java

Replace an existing code:
package com.gubs.android;

import android.app.Activity;
import android.os.Bundle;
import android.widget.TextView;

public class GubsFirstSampleAndroidApp extends Activity {
    /** Called when the activity is first created. */
    @Override
    public void onCreate(Bundle savedInstanceState) {
        super.onCreate(savedInstanceState);
        setContentView(R.layout.main);
        TextView tv = new TextView(this);
        tv.setText("Hello Android..Its Gubs and my first App");
        setContentView(tv);
    }
}

Save the class or (Ctrl + S)

Testing new android application

Now that you have saved your new project you can attempt to run it by navigating to:
Run -> Run -> Android Application -> OK


You will see the above android virtual device with your program. Andriod emulator may take some time to load. Please wait.
Click "Menu / back" in the right side of the keyboard in android emulator to go to the home page of the android emulator and click applications to see your app.


If you have questions feel free to update comments and i can try if i could help.


Tutorials i tried : 
http://fedoraproject.org/wiki/HOWTO_Setup_Android_Development
http://linuxconfig.org/get-started-with-android-application-development-using-linux-and-android-sdk
http://developer.android.com/guide/index.html


Add a column in Mysql FIRST Or AFTER


MySQL tables are easy to extend with additional columns.

Add the email column to the end of the table. To insert the new column after a specific column, such as name, use this statement:
ALTER TABLE contacts ADD email VARCHAR(60) AFTER name;
If you want the new column to be first, use this statement:
ALTER TABLE contacts ADD email VARCHAR(60) FIRST;

Coding guidelines for Method creation in Java


  • The scope of the method should be very clear (public / private / protected based on the requirement). This will be easy to identify if any changes in future for assessment. 
  • The method name and variable name should completely be relevant. Names representing methods must be verbs and written in mixed case starting with lower case (ex : getName, computeTotal)
  • Method should not exceed 50 lines. If so, create a private method and have the logic there.
  • Every method should have JavaDoc (comments) clearly with Javadoc conventions (ctrl + shift + j in eclipse will add comments. You need add some description about methods)
  • Try..Catch (Catch exception should throw to the class to caller to capture the error and provide proper error message in the UI. Catch exception should not printStackTrace.
  • Don't hardcode static number / strings. Use constants. Names representing constants (final variables) must be all uppercase using underscore to separate words. (ex : THIRD_PARTY_SOURCE => 'DFP')
  • Names representing methods must be verbs and written in mixed case starting with lower case
  • The name of the object is implicit, and should be avoided in a method name. (line.getLength(); // NOT: line.getLineLength();)
  • is prefix should be used for boolean variables and methods (isFound, isDeleted, isSet)
  •  The term find can be used in methods where something is looked up

Basic things to learn for Relational DB Table Creation


  •  Table name should be relevant. Not necessary to add project name with table name
  • First column should be integer, not null, primary key and auto increment. Have (TABLENAME_ID). It will help for the foreign key reference. Rather just saying "ID".
  • When you have NOT NULL try to have Default Value (ex : double(10,2) DEFAULT 0.00)
  • If the column is foreign key you should have a constraint and the table should be created as InnoDB Engine
  • Try to have indexing if you know the table size is going to be huge
  • Try to have constraint in db level based on the project requirement to avoid unwanted corrupted data (unique key to avoid duplicate, composite key....)
  • Have last_modified and created_on with timestamp data type column (NOT NULL) always for auditing and support. Mysql will automatically make last_modified column with Default 'Current_TimeStamp' and Extra 'on update CURRENT_TIMESTAMP'
  • Never have definer on table, view, stored procs, trigger creation. When other user take dump and restore they may face issues.
  • Foreign key (FK) name cannot have the same name in a single database. 

mysqldump Couldn’t execute references invalid table(s) or column(s) or function(s) or definer/invoker of view lack rights to use them


3 cases

  • The view is “corrupted” (this could happen if the table the view is of has been updated in a way so that the view is no longer correct – for instance if the table structure is updated)
  • The user you are using are lacking permissions (to the view/table (that the view is referencing) ) (Refer : http://gubendran.blogspot.com/2012/02/create-user-in-mysql-and-provide.html for user creation and permission)
  • Somecases view must have created based on the user definer. In this case drop the view and create the view without having definer. This is safe. Always avoid using definer on table, view, trigger and procs creation.

Create a user in mysql and provide complete permission


1. Login as root in mysql
2. create user `username`
Or Create user with password

CREATE USER 'username'@'localhost' IDENTIFIED BY 'password123'


Set password for the mysql user using grant

GRANT USAGE ON *.* TO 'bob'@'%.loc.gov' IDENTIFIED BY 'newpass';

or

SET PASSWORD FOR 'bob'@'%.loc.gov' = PASSWORD('newpass');

Give full permission to the user

GRANT ALL ON *.* TO 'user'@'localhost' IDENTIFIED BY 'pwd'

If you use grant you need flush the privileges

FLUSH PRIVILEGES;

Run below command from root. If other users need to connect to server.
 GRANT ALL ON *.* TO ''@'%' IDENTIFIED BY '';
FLUSH PRIVILEGES;

REVOKE INSERT, DELETE, UPDATE ON db_name.table_name FROM 'user'

In case of AWS RDS to provide permission for any machine to connect, create user and provide grant permission

CREATE USER 'springbot'@'%' IDENTIFIED BY 'SpringBot';

GRANT SELECT, INSERT, UPDATE, DELETE, CREATE, DROP, RELOAD, PROCESS, REFERENCES, INDEX, ALTER, SHOW DATABASES, CREATE TEMPORARY TABLES, LOCK TABLES, EXECUTE, REPLICATION SLAVE, REPLICATION CLIENT, CREATE VIEW, SHOW VIEW, CREATE ROUTINE, ALTER ROUTINE, CREATE USER, EVENT, TRIGGER ON *.* TO 'springbot'@'%' WITH GRANT OPTION;

conversion of datatype from MySQL to JAVA

MySQL Types to Java Types for ResultSet.getObject(). 

MySQL Type NameReturn value ofGetColumnClassNameReturned as Java Class
BIT(1) (new in MySQL-5.0)BITjava.lang.Boolean
BIT( > 1) (new in MySQL-5.0)BITbyte[]
TINYINTTINYINTjava.lang.Boolean if the configuration property tinyInt1isBit is set to true (the default) and the storage size is 1, or java.lang.Integer if not.
BOOLBOOLEANTINYINTSee TINYINT, above as these are aliases for TINYINT(1), currently.
SMALLINT[(M)] [UNSIGNED]SMALLINT [UNSIGNED]java.lang.Integer (regardless if UNSIGNED or not)
MEDIUMINT[(M)] [UNSIGNED]MEDIUMINT [UNSIGNED]java.lang.Integer, if UNSIGNED java.lang.Long (C/J 3.1 and earlier), or java.lang.Integer for C/J 5.0 and later
INT,INTEGER[(M)] [UNSIGNED]INTEGER [UNSIGNED]java.lang.Integer, if UNSIGNED java.lang.Long
BIGINT[(M)] [UNSIGNED]BIGINT [UNSIGNED]java.lang.Long, if UNSIGNED java.math.BigInteger
FLOAT[(M,D)]FLOATjava.lang.Float
DOUBLE[(M,B)]DOUBLEjava.lang.Double
DECIMAL[(M[,D])]DECIMALjava.math.BigDecimal
DATEDATEjava.sql.Date
DATETIMEDATETIMEjava.sql.Timestamp
TIMESTAMP[(M)]TIMESTAMPjava.sql.Timestamp
TIMETIMEjava.sql.Time
YEAR[(2|4)]YEARIf yearIsDateType configuration property is set to false, then the returned object type is java.sql.Short. If set to true (the default) then an object of type java.sql.Date (with the date set to January 1st, at midnight).
CHAR(M)CHARjava.lang.String (unless the character set for the column is BINARY, then byte[] is returned.
VARCHAR(M) [BINARY]VARCHARjava.lang.String (unless the character set for the column is BINARY, then byte[] is returned.
BINARY(M)BINARYbyte[]
VARBINARY(M)VARBINARYbyte[]
TINYBLOBTINYBLOBbyte[]
TINYTEXTVARCHARjava.lang.String
BLOBBLOBbyte[]
TEXTVARCHARjava.lang.String
MEDIUMBLOBMEDIUMBLOBbyte[]
MEDIUMTEXTVARCHARjava.lang.String
LONGBLOBLONGBLOBbyte[]
LONGTEXTVARCHARjava.lang.String
ENUM('value1','value2',...)CHARjava.lang.String
SET('value1','value2',...)CHARjava.lang.String
Connection Properties - Miscellaneous. 
These MySQL Data TypesCan always be converted to these Java types
CHAR, VARCHAR, BLOB, TEXT, ENUM, and SETjava.lang.String, java.io.InputStream, java.io.Reader, java.sql.Blob, java.sql.Clob
FLOAT, REAL, DOUBLE PRECISION, NUMERIC, DECIMAL, TINYINT, SMALLINT, MEDIUMINT, INTEGER, BIGINTjava.lang.String, java.lang.Short, java.lang.Integer, java.lang.Long, java.lang.Double, java.math.BigDecimal
DATE, TIME, DATETIME, TIMESTAMPjava.lang.String, java.sql.Date, java.sql.Timestamp
// Below script tag for SyntaxHighLighter